
Why Homemade Emergency Food Bars Are Essential?
When a crisis hits, food security becomes a top concern. Whether you’re prepping for natural disasters, power outages, or long-term survival scenarios, having reliable, long-lasting food is critical. That’s where homemade emergency food bars come in. These compact, nutrient-dense bars provide sustained energy, essential nutrients, and long shelf life, making them a pantry staple for emergency preparedness.
But why bother making them at home when store-bought options exist? The answer is simple: control over ingredients, cost savings, and superior nutrition. Let’s break it down.
If you’re looking for other quick and easy recipes for emergency meal planning, check out these quick and easy meals that can be prepared in no time.
The Role of Survival Food in Crisis Situations
In emergencies, access to fresh food can be limited. Whether it’s a hurricane, earthquake, or economic collapse, having food that’s shelf-stable and calorie-dense can mean the difference between staying strong or struggling to function.
Unlike regular snacks, homemade emergency food bars are specifically designed to:
- Provide long-lasting energy – Packed with proteins, healthy fats, and slow-digesting carbs, they keep you full longer.
- Be shelf-stable for years – Properly stored, these bars can last months or even years without refrigeration.
- Stay lightweight and portable – Unlike canned goods, they are compact and easy to carry, making them perfect for go-bags and emergency kits.
Benefits of Homemade vs. Store-Bought Survival Bars
Many store-bought energy bars contain artificial ingredients, preservatives, and excessive sugars. They may also lack the long shelf life needed for true emergency preparedness.
Cost-Effectiveness and Customization
Homemade bars are cheaper in the long run. When you buy ingredients in bulk, you can make dozens of bars for the price of a few commercial ones. Plus, you get to customize them to fit your dietary needs, whether you’re gluten-free, keto, or vegan.
Avoiding Preservatives and Artificial Ingredients
Most commercial ration bars use preservatives, artificial flavors, and excess sugar. By making them at home, you ensure:
- No unnecessary additives
- Better nutrient quality
- A balance of macros tailored to your needs
Who Needs Homemade Emergency Food Bars?
Emergency food isn’t just for doomsday preppers. These bars are useful for various lifestyles and situations, from hardcore survivalists to casual campers.
Preppers and Survivalists
For serious preppers, having a sustainable food source is non-negotiable. Homemade emergency food bars provide a lightweight, high-calorie, and long-lasting option that can be stored indefinitely with proper sealing.
Many preppers also follow DIY food preservation techniques, so making ration bars is a natural extension of their skillset.
Outdoor Enthusiasts and Hikers
If you hike, camp, or backpack, you know the value of lightweight, energy-dense food. Unlike granola bars, survival ration bars contain more calories per ounce, keeping you fueled during intense outdoor adventures.
For long treks, carrying a few homemade bars ensures you have emergency food in case you run out of supplies.
Emergency Preparedness for Families
Natural disasters can strike anytime. Hurricanes, blizzards, or power outages can disrupt food supply chains. Having a stash of homemade emergency food bars ensures that your family has something nutritious and filling to eat when fresh food isn’t available.
They’re also great for kids, as you can adjust the recipe to make them more palatable while still being nutritious.
Key Ingredients for Long-Lasting Homemade Emergency Food Bars
When making homemade emergency food bars, choosing the right ingredients is crucial. The goal is to create a high-calorie, nutrient-dense bar that provides sustained energy and a long shelf life. Here’s what you need to focus on.
High-Calorie Ingredients for Sustained Energy
Homemade Emergency Food Bars are all about maximum calories in minimal space. This means using ingredients rich in healthy fats, proteins, and complex carbohydrates to keep you going for hours.
Nuts, Seeds, and Fats for Energy Density
Nuts and seeds are packed with healthy fats, protein, and fiber, making them ideal for survival food. Some of the best options include:
- Almonds – High in monounsaturated fats and vitamin E, great for heart health.
- Peanuts – Affordable, calorie-dense, and high in protein.
- Chia and flaxseeds – Rich in omega-3 fatty acids and fiber for digestion.
- Coconut oil – A stable fat that adds moisture and extends shelf life.
Since fats can go rancid over time, it’s essential to store your bars properly (we’ll cover that soon).
Honey, Syrups, and Sugar for Natural Preservation
Sugars act as a natural preservative by reducing moisture and preventing bacteria growth. They also provide quick energy, making them a must-have in survival bars.
Great options include:
- Honey – Naturally antibacterial, adds sweetness, and extends shelf life.
- Maple syrup – A natural alternative to processed sugar, rich in minerals.
- Brown sugar or molasses – Helps with texture and caramelization.
A combination of natural sugars and complex carbs ensures a steady energy release rather than a sugar crash.
Protein Sources for Endurance
While carbs and fats provide energy, protein is essential for muscle repair and stamina. In emergency situations, having enough protein helps prevent fatigue and muscle breakdown.
Powdered Milk, Whey, or Plant-Based Protein
Dairy-based proteins like whey or powdered milk work well in survival bars because they:
- Boost protein content
- Help bind ingredients together
- Improve flavor and texture
For a vegan-friendly alternative, you can use pea protein, soy protein, or almond flour.
For those following a low-carb lifestyle, you might also enjoy these best keto ice cream bars as a delicious, shelf-stable snack alternative.
Meat-Based Options Like Pemmican
Pemmican is an ancient survival food made from dried meat, tallow (fat), and berries. It’s incredibly calorie-dense and shelf-stable for years when stored correctly.
Adding powdered beef jerky or dehydrated meats can enhance protein content and flavor in your Homemade Emergency Food Bars. However, it’s best suited for those who don’t mind a meat-based survival bar.
Maximizing Shelf Life of Homemade Emergency Food Bars
Storing your homemade emergency food bars properly is just as important as choosing the right ingredients. Without proper storage, fats can go rancid, and moisture can cause spoilage.
Choosing the Right Binding Agents and Preservatives
The binding agents in your bars affect both texture and longevity. The right choices will ensure they stay firm and intact over time.
Best binding agents for survival bars:
- Honey or molasses – Acts as both a natural preservative and a binder.
- Peanut butter or almond butter – Adds flavor, moisture, and protein.
- Gelatin or agar-agar – Helps maintain a firm texture for longer shelf life.
Using natural preservatives like honey and salt can further extend shelf life without chemicals.
Proper Storage Techniques: Airtight Containers & Vacuum Sealing
To prevent spoilage, moisture exposure must be minimized. The best storage methods include:
- Vacuum sealing – Removes air, preventing oxidation and mold.
- Mylar bags with oxygen absorbers – Ideal for long-term storage (1+ years).
- Airtight containers – Good for short-term use (3-6 months).
If storing for an extended period, keep bars in a cool, dark place to prevent heat from breaking down the fats and proteins.
Understanding Moisture Control and Rancidity Prevention
Moisture is the enemy of shelf-stable food. If your bars contain too much moisture, they will spoil within weeks instead of months.
Here’s how to keep them dry:
- Dehydrate before storage – Use an oven or dehydrator to remove excess moisture.
- Use dry ingredients – Avoid fresh fruits; opt for dehydrated or freeze-dried versions.
- Add natural preservatives – Honey and salt help absorb excess moisture.
When stored correctly, homemade emergency food bars can last anywhere from 6 months to 5 years, depending on ingredients and storage methods.
For more details on safe food storage techniques, check out this trusted resource from the USDA.
Creating long-lasting, high-calorie homemade emergency food bars is all about choosing the right ingredients and storing them properly. Whether you’re prepping for natural disasters, hiking trips, or long-term survival, these bars provide sustained energy and peace of mind.
Now that you know what goes into making the perfect survival bar, let’s move on to how to make them step by step.
Easy Homemade Emergency Ration Bar Recipes
Now that we know what makes a great survival bar, it’s time to get hands-on. These homemade emergency food bars are packed with calories, protein, and essential nutrients, making them perfect for preppers, hikers, and anyone preparing for emergencies.
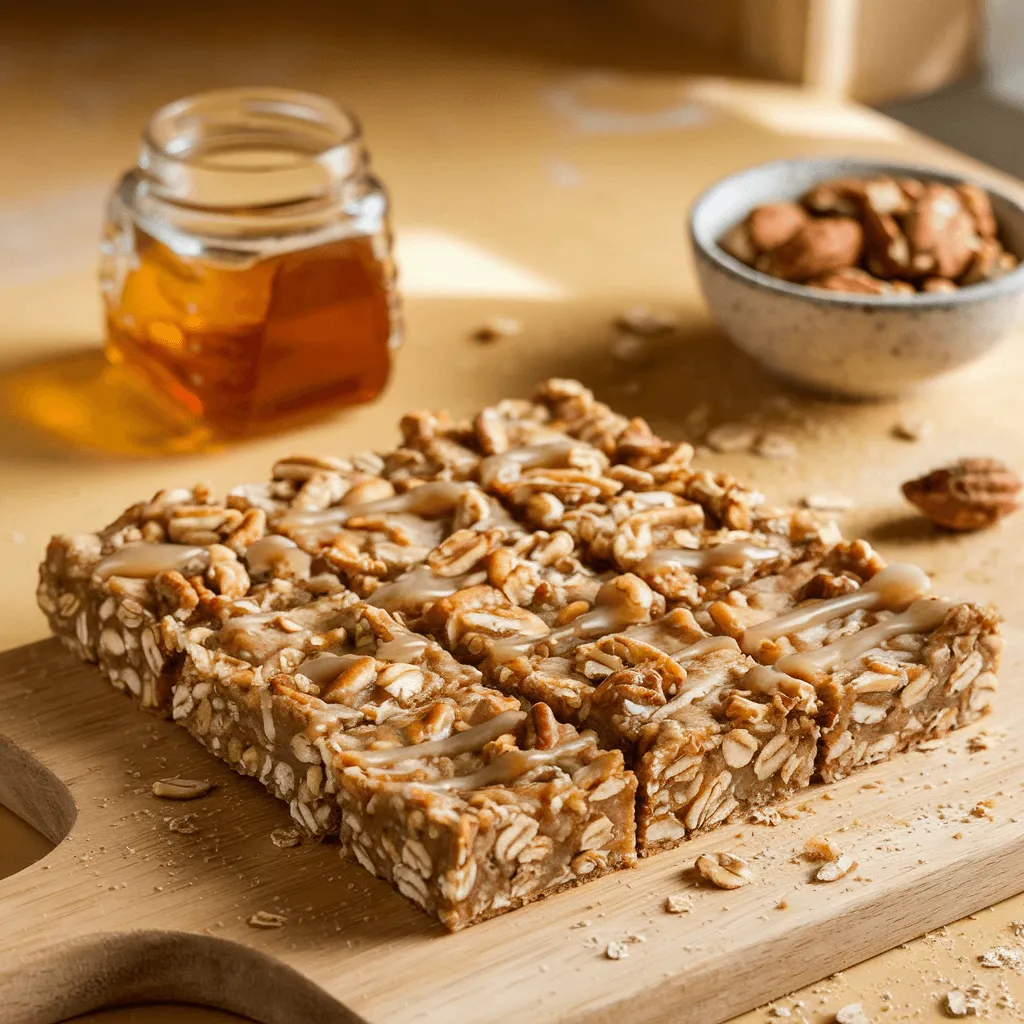
Classic High-Calorie Survival Bars Recipe
This basic survival bar is packed with oats, honey, and peanut butter, ensuring long shelf life and high energy density.
Ingredients:
- 2 cups oats (rolled or quick)
- 1/2 cup honey or maple syrup
- 1/2 cup peanut butter (or almond butter)
- 1/2 cup dry milk powder (for protein)
- 1/4 cup chopped nuts or seeds (almonds, sunflower seeds, etc.)
- 1/2 teaspoon salt
- 1 teaspoon cinnamon (optional)
- 1/4 cup dried fruit (raisins, cranberries, or chopped dates – optional)
- 1/4 cup coconut oil or melted butter (for extra calories and binding)
Instructions:
- Mix the dry ingredients – In a large bowl, combine oats, powdered milk, nuts, salt, and cinnamon.
- Heat the wet ingredients – In a saucepan, warm honey, peanut butter, and coconut oil over low heat until smooth.
- Combine everything – Pour the wet mixture into the dry ingredients and stir until well combined.
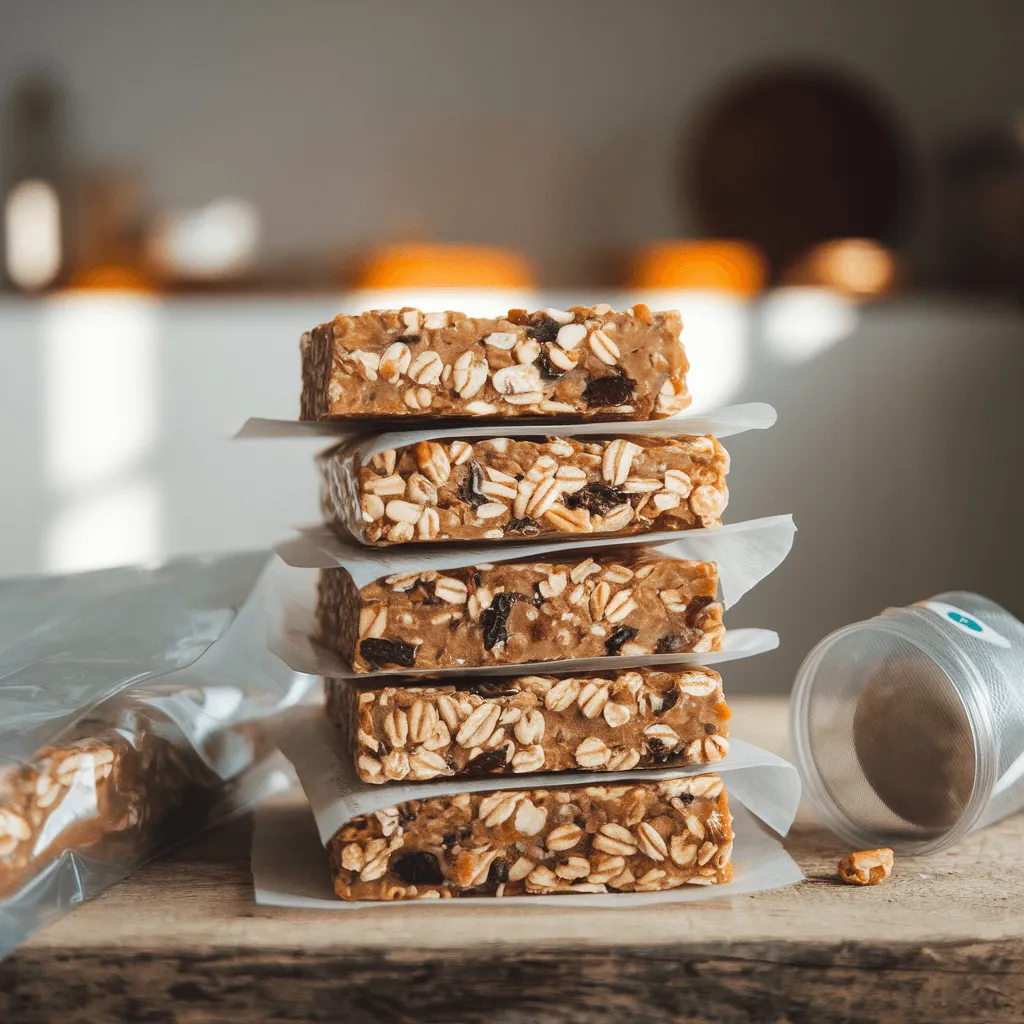
- Press into a baking dish – Line an 8×8-inch dish with parchment paper and press the mixture firmly into an even layer.
- Bake or dehydrate – Bake at 250°F for 60 minutes or dehydrate at 130°F for 4-6 hours until firm.
- Cool and cut – Let the bars cool completely before cutting into squares or rectangles.
- Store properly – Wrap in wax paper, vacuum-seal, or store in an airtight container.
Shelf Life: If vacuum-sealed and stored in a cool, dry place, these bars can last 6 months to a year.
Homemade Pemmican Bars: A Traditional Survival Food
Pemmican is a classic survival food used by Native Americans and early explorers. It’s a high-fat, high-protein bar with an incredible shelf life of 5+ years when stored properly.
Ingredients:
- 1 cup lean, dried meat (beef, venison, or bison, ground into powder)
- 1/2 cup tallow (or coconut oil for a plant-based alternative)
- 1/4 cup dried berries (blueberries, cranberries, or raisins)
- 1/4 teaspoon salt
Instructions:
- Grind the dried meat – Use a food processor to turn the dried meat into a fine powder.
- Melt the fat – Heat tallow or coconut oil over low heat until fully melted.
- Mix everything together – Combine the dried meat, melted fat, salt, and berries in a bowl. Stir until well coated.
- Shape into bars – Press the mixture into a baking dish or shape it into small patties.
- Cool and store – Let the bars harden before wrapping and storing in an airtight container.
Shelf Life: Up to 5 years if kept in a cool, dry place and vacuum-sealed.
Protein-Packed Food Bars for Sustained Nutrition
For those needing extra protein, these bars combine whey protein, seeds, and peanut butter for a muscle-sustaining survival snack.
Ingredients:
- 1 1/2 cups oats
- 1/2 cup protein powder (whey, soy, or pea protein)
- 1/2 cup nut butter
- 1/4 cup chia or flaxseeds
- 1/2 cup honey or agave syrup
- 1/4 cup coconut oil
Instructions:
- Mix dry ingredients – In a bowl, combine oats, protein powder, and seeds.
- Heat wet ingredients – Warm nut butter, honey, and coconut oil until smooth.
- Combine everything – Stir the wet mixture into the dry ingredients.
- Shape and chill – Press into a dish, refrigerate for 2 hours, then cut into bars.
Shelf Life: 3–6 months when stored in a cool, dry place.
Step-by-Step Guide to Making Long-Shelf-Life Survival Bars
Creating homemade emergency food bars is simple, but proper preparation ensures longer shelf life and better texture.
Mixing the Ingredients for Optimal Texture and Binding
- Use sticky binders like honey, peanut butter, or syrup to hold the bars together.
- Dry ingredients should be finely ground for a dense, compact texture.
- For chewy bars, use coconut oil and dried fruits.
- For hard, cracker-like bars, reduce moisture and bake longer.
Baking, Dehydrating, or No-Bake Methods
Baking:
- Ideal for firm, long-lasting bars.
- Bake at 250°F for 60 minutes to remove excess moisture.
Dehydrating:
- Great for ultra-long shelf life (1+ years).
- Dehydrate at 130°F for 6–8 hours.
No-Bake:
- Best for quick energy bars but requires refrigeration.
- Ideal for short-term survival (3–6 months).
Proper Cooling, Cutting, and Packaging for Storage
- Cool bars completely before cutting to prevent crumbling.
- Use a sharp knife to cut even portions for easy rationing.
- Vacuum-seal or use Mylar bags with oxygen absorbers for long-term storage.
- Store in a cool, dark place to prevent fats from going rancid.
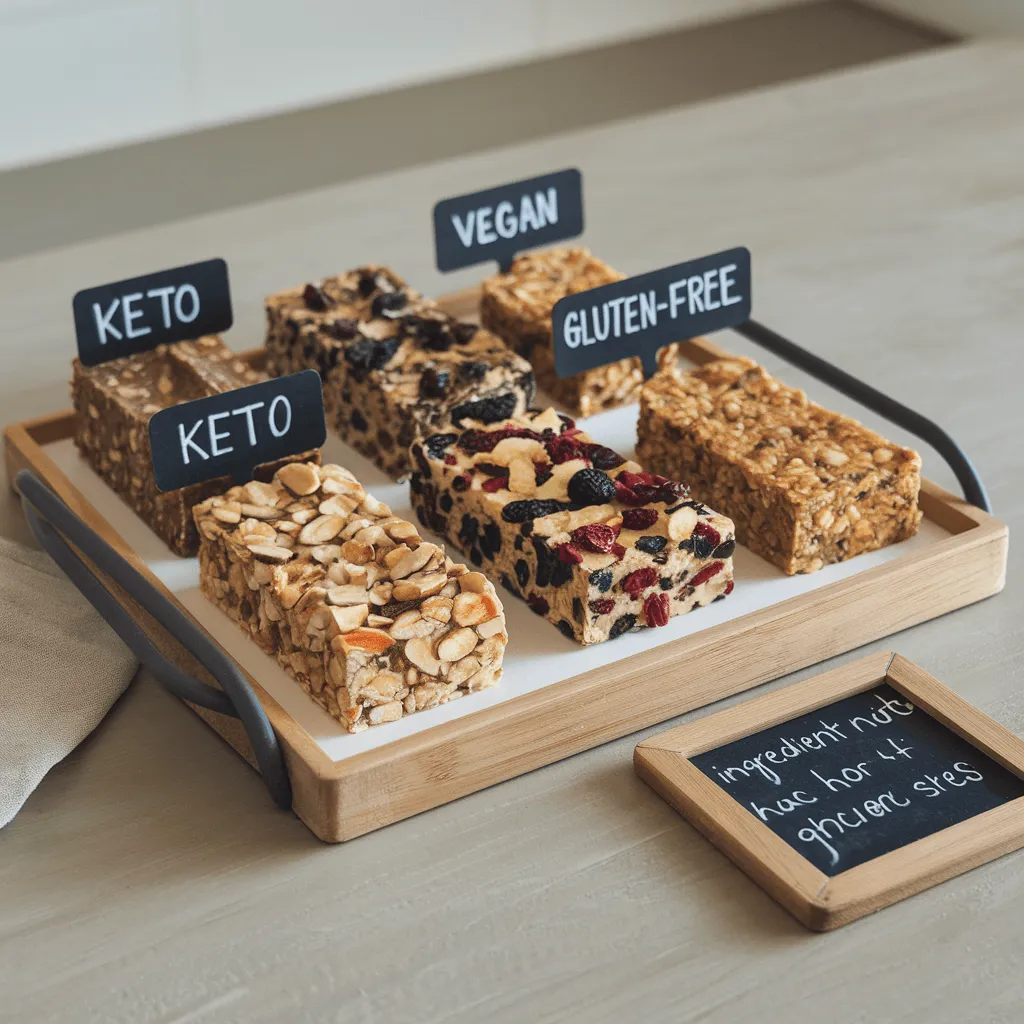
Customizing Emergency Ration Bars for Dietary Needs
Gluten-Free and Keto-Friendly Survival Bars
- Replace oats with almond flour or coconut flour.
- Use monk fruit sweetener instead of honey.
- Add extra coconut oil or nuts for higher fat content.
Vegan and Plant-Based Emergency Bars
- Use pea protein or hemp protein instead of whey.
- Replace honey with maple syrup or agave.
- Add chia seeds or flaxseeds for extra nutrition.
Adding Vitamins and Electrolytes for Enhanced Nutrition
- Include dried greens powder for added vitamins.
- Add electrolyte powder or sea salt to prevent dehydration.
- Use flaxseed or hemp seeds for omega-3s.
Homemade emergency food bars are a reliable, cost-effective way to ensure you have nutrient-dense, high-calorie food in any situation. By customizing ingredients and storage methods, you can make bars that last months or even years.
Now that you have the recipes and techniques, let’s discuss how to use these bars effectively in real-life survival situations.
When and How to Use Homemade Emergency Ration Bars
Incorporating Ration Bars in Emergency Food Kits
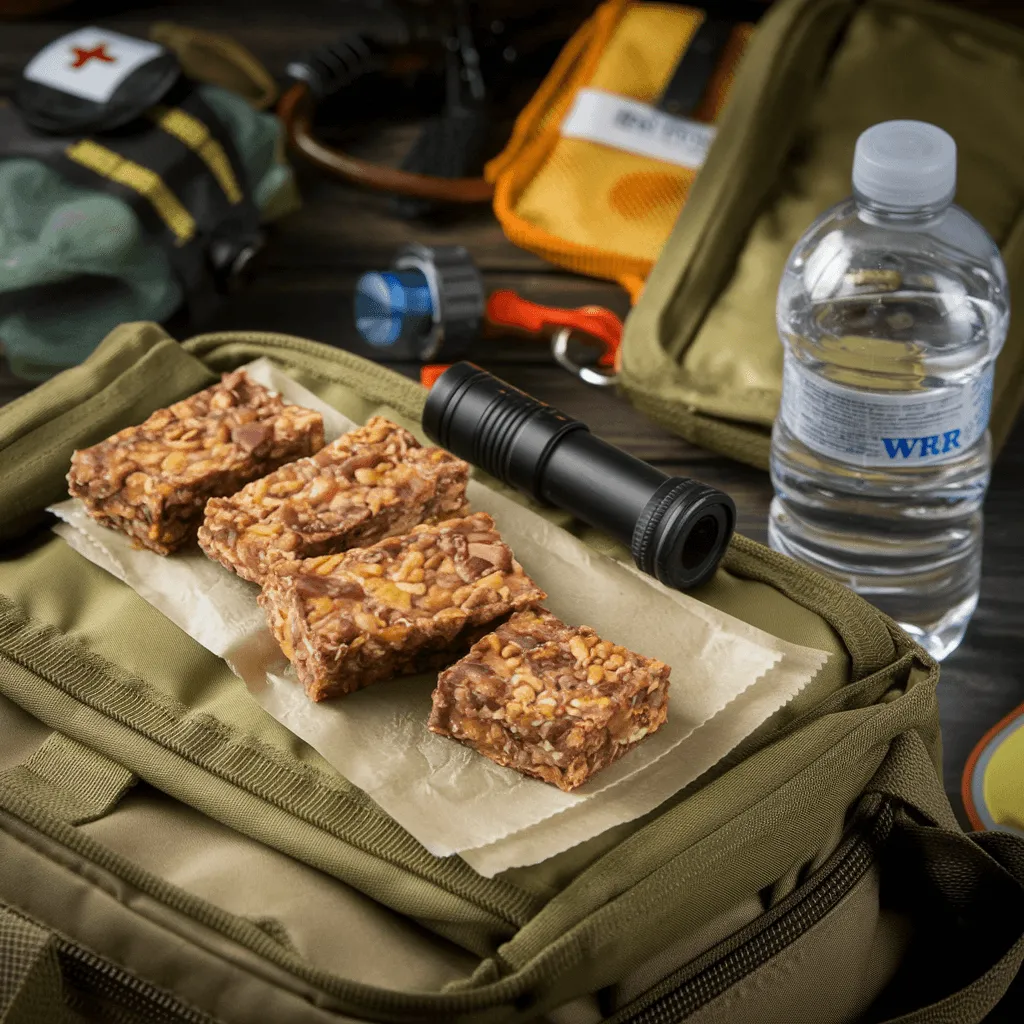
Having homemade emergency food bars in your survival kit ensures a reliable food source when fresh food is unavailable. These bars are lightweight, compact, and calorie-dense, making them perfect for 72-hour kits, bug-out bags, and long-term food storage.
To integrate them into your emergency supplies:
- Vacuum-seal and label each batch with the preparation date.
- Rotate every 6–12 months, checking for signs of spoilage.
- Pair with water and electrolyte sources to maintain hydration.
Using Survival Bars for Hiking and Camping
Outdoor enthusiasts benefit from homemade survival bars because they don’t require cooking or refrigeration. When planning a hiking trip or camping adventure, bring a few bars as a quick, non-perishable snack.
Best practices:
- Store bars in waterproof bags to protect against moisture.
- Pack different flavors to avoid taste fatigue.
- Combine with dried fruit, nuts, or jerky for variety.
Rationing and Consumption Strategies in a Crisis
In emergencies, rationing food extends your supply and prevents malnutrition. Because these bars are nutrient-dense, consuming smaller portions throughout the day helps sustain energy levels.
- Eat in small increments (every 3–4 hours) to maintain stamina.
- Pair with water to aid digestion and prevent dehydration.
- Monitor intake based on physical activity levels.
FAQs
1. How Long Do Emergency Food Bars Last?
The shelf life of homemade emergency food bars depends on ingredients and storage methods. If stored in vacuum-sealed bags or Mylar pouches with oxygen absorbers, they can last 6 months to 5 years. However, bars with high-fat content or fresh fruit may spoil faster, so always check for rancid smells or texture changes before eating.
2. Can You Make Emergency Food Bars Without an Oven?
Yes, you can make no-bake survival bars by using dehydration or refrigeration. Instead of baking, you can:
- Press the mixture into a dish and refrigerate until firm.
- Use a food dehydrator to remove moisture, extending shelf life.
- Air-dry bars in a low-humidity environment if you lack power.
Baking, however, enhances stability and texture, making the bars less crumbly and more compact for long-term storage.
3. What’s the Best Way to Store Emergency Food Bars for Maximum Freshness?
To maximize freshness, store your bars using:
- Vacuum-sealing to remove air exposure.
- Mylar bags with oxygen absorbers for long-term storage.
- Airtight glass jars for short-term (1–3 months) use.
Keep them in a cool, dark place, as heat and humidity speed up spoilage. Checking bars every few months ensures they remain safe to eat.
4. How Do Homemade Emergency Food Bars Compare to Commercial MREs?
Homemade emergency food bars have fewer preservatives, better nutritional value, and are customizable, whereas commercial MREs contain preservatives and artificial ingredients for ultra-long shelf life.
However, MREs are designed for military and survival conditions, meaning they often have higher sodium levels and require water to prepare certain meals. If you want healthier, cost-effective alternatives, homemade bars are a better option.
5. Can You Add Fruits and Nuts Without Reducing Shelf Life?
Yes, but it’s essential to use dried or freeze-dried fruits and nuts to prevent spoilage. Fresh fruit contains moisture, which can lead to mold and bacteria growth over time. When using nuts, opt for low-oil varieties and store bars in cool temperatures to prevent the fats from going rancid.
6. What’s the Best Way to Test the Longevity of Homemade Emergency Food Bars ?
To test shelf life:
- Store a small batch in different conditions (room temperature, freezer, vacuum-sealed).
- Check every 3–6 months for odor, texture, and taste changes.
- Use a moisture meter if available, as low moisture equals longer shelf life.
If bars smell off or taste bitter, the fats may have gone rancid, indicating they’re no longer safe to eat.
Making your own homemade emergency food bars ensures you have nutrient-dense, long-lasting food for any situation. Whether you’re a prepper, outdoor enthusiast, or just planning ahead, these bars offer a cost-effective, customizable alternative to commercial survival foods.
By using proper ingredients and storage methods, you can create bars that last months or even years, giving you peace of mind in an emergency.